Christmas Divinity Candy
Divinity can be tricky. You really really need a candy thermometer to get it right, and you need a dry day – a humid day will ruin your divinity.
You will need:
2 1/2 cups sugar
1/2 cup light Karo corn syrup (they have this at the Sultan Center, but it is EXPENSIVE!)
1/2 cup water
1/4 teaspoon salt
2 egg whites
1 teaspoon vanilla (or peppermint, if you can get it)
3/4 cup chopped walnuts
In a heavy pan, stir together sugar, corn syrup, water and salt. Using a candy thermometer, cook and stir over medium heat until sugar dissolves, carefully, so that you don’t splash this on the sides of the pan.
Once sugar has dissolved, don’t stir it any more, just keep cooking until the candy thermometer shows 260 F. Take off heat immediately.
In a large bowl, beat egg whites until they are stiff – you will need a mixer or hand mixer to do this right.
Pour the hot syrup in a thin stream over egg whites, using your mixer at a high speed. Adding the syrup slowly is the key to this recipe working.
Add vanilla, beat at high speed 4 or 5 minutes or until candy starts to hold it’s shape when you lift the beaters out. Mixture will be ribbony, and sort of hold it’s shape.
Drop by spoonfuls onto waxed paper. If it flattens out, beat the mixture another minute, then try again. Try not to overbeat; the mixture will get hard and stiff! If this happens, stir in a couple drops of hot water until it softens just enough. Yeh, it sounds tricky, but it’s just getting the right texture. You really can do this.
When the texture seems stiff enough but not too stiff, add the nuts in quickly, then drop by teaspoon on waxed paper, allow to cool and dry. (Some people add other inclusions – candied fruit pieces, chocolate chips, peppermint candies, crushed into small pieces, etc. I’m a purist – divinity is just white with nuts!) Store tightly covered – divinity absorbs humidity! Best if served the day it is made, or very soon. It is so good it doesn’t last very long, people just gobble it up.
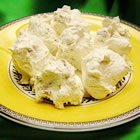
This photo is from AllRecipes.com.
Easy Kraft Christmas Fudge
This fudge is just so easy, it’s a sin. The only problem is finding Marshmallow Creme if you are living in a country where it is not readily available. We normally bring it with us when we come back from the US.
A plate of this fudge makes a great gift for a teacher or hostess.

3 cups sugar
3/4 cups butter
2/3 cups Carnation Evaporated milk, undiluted
1 12 ounce package semi-sweet chocolate chips
1 7 ounce jar Kraft Marshmallow Creme
1 cup chopped walnuts
1 teaspoon vanilla
Combine sugar, butter, and milk in heavy saucepan, bring to a full boil, stirring constantly. Continue boiling 5 minutes over medium heat, stirring constantly to prevent burning.
Take off heat, stir in chocolate chips and stir until melted.
Add Marshmallow creme, nuts and vanilla, and stir until well blended. Pour into a greased 9 x 13 inch pan. Cool at room temperature, then cut into squares. It’s a good idea to cut it sooner rather than later, as when it hardens, it is harder to cut into uniform squares.
This recipe doubles beautifully. If you are going to the trouble to make fudge, you might as well make a lot. 🙂
How easy is that??!!
Extra Credit Christmas Cookies: Rosettes
OK, good on ya, you’ve done your shopping and the cupboards are bulging. You’re already planning how to knock out those basic cookies, but now – now we get to think about trying something a little more challenging.
I will admit, this is not such a challenge to me. I grew up watching these made every year, it’s a Swedish thing. Now I make them every year, continuing the tradition. So I am going to share all the secrets with you, and you are going to do just fine.
First, a little theory. The rosettes I make every year use a sweet, lemon flavored mixture. Twice I have made savory timbales – you use a different batter. Those timbales are used to serve vegetables or something like lobster newburg when you have a lot of time and you want something to look very elegant, but the truth is, it’s a lot of work.
Meanwhile, rosette cookies for Christmas are also a lot of work, but you make a big batch at once, they last for up to six weeks in an airtight container, and they look very very cool and take up a lot of space on a cookie tray. And everyone thinks you are amazing, because they look so hard, but really, they’re not that hard.
Basic Rosette Lemon Batter
Beat 2 eggs
add 1 cup milk
Sift 1 cup flour
with a pinch of salt
1 Tablespoon sugar
Add to above and mix all together. It should look like thick cream. Add:
2 teaspoons of lemon extract, stir in.
Then you let the batter stand at least an hour. I often make it the night before and let it stand in the refrigerator overnight, then pull it out when I get up so that it warms up to room temperature. If you don’t let it stand, it doesn’t blend the right way.
You can do this in a pan on the stove . . .I did it that way for many years. But there is this wonderful machine called a deep fryer . . . if you have one, you are home free. I use something called a Fry Daddy, which is just the right size.
You will need a LOT of oil. I use a very mild vegetable oil like safflower oil or corn oil, something that doesn’t have a strong flavor on its own.
Warm the oil to 375 F/180 C.
Put out several sheets of paper towel. When the hot rosette comes out of the oil, you will pry it off the mold with the tines of a fork and let it rest upside down on the papertowel to absorb any of the excess oil.
Have a fork handy.
Choose the rosette wheel you want to use – most kits come with two or three. The most classic is a wheel shaped, but I also use a star and occasionally have used a butterfly. The timbale shape is also wheel shaped, but without all the divisions. Attach the form you choose firmly to the iron.
Get a comfortable chair, and sit by the hot oil. Have your bowl of batter right next to you, and paper towels nearby. Please, this isn’t something to do with children around, not when you are working with 3 – 4 cups of sizzling oil.
Dip the rosette iron in the hot oil, maybe five seconds, so it gets hot. (A hot iron is the secret to being able to get the rosette off easily when it is finished cooking.) Pull it out, tap it against the side of the pan to knock off excess oil.
Dip it quickly into the batter, it will hiss as the hot oil hits the cooler batter. Hissing is good, it means the iron is hot enough.
But dip into the batter only up to the top edge, not over the top edge! If the batter goes over the top edge, you will not be able to get the rosette off when it finished cooking.
So now you have a hot iron with batter on it, just right.
Plunge it into the hot oil. It will really hiss and bubble, that is what it is supposed to do, that means it is cooking. It will only hiss and bubble for maybe 30 seconds, then the hissing and bubbling will slacken. Somewhere between 45 seconds and 1 minute, pull the rosette out and see if it looks crisp and golden. Turn it upside down, tap excess oil back into the hot oil.
Over the paper toweling, use your fork to gently pry the rosette away from the mold in a couple places, and using gentle pressure, push the rosette off the mold. Place it upside down on the toweling so that it drains. One down!
At first, take it one at a time until you feel comfortable that you’ve got the hang of it. Then – you can actually do two irons at once. You let one iron heat while you are cooking the other rosette, then switch back and forth.
From time to time, maybe every ten rosettes, stir the batter again, because it can get oily and needs to be stirred.
If you do this with a pan on the stove, it is harder to maintain a steady temperature, and you will need a hot oil thermometer to keep track of it. When the oil gets too cool, the rosettes turn out too light and too floppy. If they get overcooked, they get too brown and they are hard to get off the iron. The deep fat fryer is your best bet for maintaining an even temperature.
This is also something more fun to do with a sister or a friend. My Mother and her best friend did it every year together; it was their special tradition.
OK, when you are finished with all your rosettes, and they have cooled, store them in a large tupperware container, WITHOUT CROWDING. These are so fragile, and they break easily.
Sift Powdered Sugar over Rosettes
When you want to take a tray of rosettes somewhere, you need to sift powdered sugar over the top, with the empty side up (the way they were when they were cooking) so that the powdered sugar goes down into the crevasses.
Some people use a sifter, but my preference is to use a small basket seive/strainer with a handle, put powdered sugar in it and tap it on the side with a fork. It controls where the sugar falls a little better, and gives more control over how much sugar you put on each rosette. Put them on the platter empty side up, so that they look all snowy and sugary and crisp.
WARNING! Do not attempt to eat one of these wearing a black dress! They are crisp, and they crumble, and sometimes powdered sugar goes everywhere, and it is a (mess) to get off.
As the cook, you get to eat the mistakes as you go along. At the end, you won’t want to eat any more. They aren’t so sweet, but they are mostly FAT! You will get other recipes for rosettes with your iron.
Have fun.
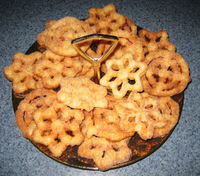
I found this photo at About housewares and it is a good photo, but to my way of thinking, the rosettes are upside down. I serve them the other way.
2011 Update: I used a Fry Daddy this year and every single rosette turned out perfectly. 🙂
Today’s Grin: We are Forbidden to Report the Following Story
Todays Kuwait Times bottom left corner:
Information Gags Press
Kuwait: The Ministry of Information issued a gag order to all local media over reporting the tussle between two leading Kuwait companies over the September takeover of a KSE-listed firm. A copy of the court order ordering the ban was attatched to the ministry’s letter to all local dailies and media. The following is a translation of the accompanying Arabic letter (shown on the front page):
From the Ministry of Information, To the Editor-in-Chief, Kuwait Times. With reference to case number 900/2006 filed by Mohammed Abdul Mohsen Al-Kharafi Holding Co and Mohammed Abdul Mohsen Al-Khorafi & Sons for General Trading and Contracting against the Minister of Commerce and Industry as the supreme chairman of the Kuwait Stock Exchange (KSE), a court order has been issued pertaining to the banning of the publication of any news concerning the subject of the contestation (number 2/2006) till a verdict is issued concerning the nondisclosure violations. Therefore, please be advised to stop any publication till the case is over.
So the Kuwait Times reports that it cannot report the story. Brilliant.
Africa’s Oldest Pupil
This is a story I saw in last week’s Kuwait Times, but I can’t get it out of my mind. This humble man, with his ongoing search for knowledge, is an inspiration to me.
Source: Reuters
(This story is part of a special report on education in Africa, issued on Nov. 15)
By Andrew Cawthorne
ELDORET, Kenya, Nov 15 (Reuters) – With his stubbly grey beard and walking stick at his side, 86-year-old Kimani Maruge looks a little out of place among the rows of children sitting behind wooden desks at Kapkenduiywo Primary School. Yet classmates 10 times his junior would be hard-pressed to match the enthusiasm of Maruge, a farmer and veteran of Kenya’s 1950s anti-colonial Mau Mau revolt, who has the distinction of being the oldest pupil on the planet.
“I will only stop studying if I go blind or die,” Maruge says at the crowded school in a poor neighbourhood outside Eldoret in Kenya’s western farmlands.
The illiterate great-grandfather – who has outlived 10 of his 15 children — jumped at a belated chance to educate himself when President Mwai Kibaki introduced free primary schooling in the east African nation in 2003.
Enrolment across Kenya shot up overnight, with 1.2 million more children going to school. Kapkenduiywo had 375 pupils before Kibaki’s measure, and now has 892.
But there are none quite like Maruge. He says his inspiration came from listening to a preacher in church and suspecting he was misinterpreting the Bible.
“I wanted to go to school to be able to read the Bible for myself,” he says, tucking his long legs under a tiny, shared desk at the front of his overcrowded classroom of 96 pupils. “And in case there is ever any compensation for us Mau Mau, I would like to be able to count my money properly at the bank,” he adds with a large grin.
PERSISTENCE PAID OFF
When he first turned up at the school gates in regulation knee-length socks, cut-off trousers and navy blue jumper, Maruge was greeted with laughter. Teaching staff tried at first to direct him to adult education classes. But when he returned again and again, they realised he would not be deterred, and anyway there is no legal age-limit for primary school entrance in Kenya.
“Inside me, when I saw him there, I felt he was serious,” says headmistress Jane Obinchu. “And look at him now. Nearly three years later, he’s still here. He’s over the most difficult part, he won’t drop out now.”
In the classroom, Maruge’s favourite subjects are Swahili and maths, but he struggles with English which is new and strange to him. He is treated like any other schoolboy except for one privilege: tea at break. Fellow pupils treat him with care and respect, and love to listen to his tales of Kenyan history between classes.
“He tells us about the Mau Mau,” says Ireen Wairimu, 11. “And about the time when white kids used to go to school under a roof while African kids sat under trees.”
Hobbling on a foot he says was disfigured when he was tortured by British colonial captors during the Mau Mau revolt, Maruge cannot keep up with all the playground games. But he watches with relish and is always surrounded by chattering kids.
“They are my friends, they love me, they help me walk home,” he says. “I want to break the barriers between old and young.”
INTERNATIONAL POSTER-BOY
Known in his neighbourhood as “Mzee” – a Swahili term of respect for an elder – Maruge is happy to show off his new knowledge, reading passages of the Bible slowly and clearly in front of his house after school. Although still living humbly, Maruge has become a national celebrity and something of a poster boy for free education campaigners worldwide. Last year, he was feted at the United Nations in New York. This year, a Hollywood crew are working on a film about him.
“School has changed him. He looks younger and happier, rejuvenated by getting a second chance in life,” says headmistress Obinchu. “He calls me his mother, but I am the age of his daughters. He is an inspiration to all of us.”
Despite his advanced years, Maruge has plenty of dreams for the future. “I won’t stop. I want my name one day to be Professor, Doctor Kimani!,” he says, holding his books close to his chest. “Liberty is learning, you know.”
Bahrain Censors Google Earth
This morning my nephew from GE sent me an e-mail with an article from the Financial Times on Mahmoud’s Den and Google Earth in Bahrain. When Google Earth upgraded the resolution on Bahrain, Bahrainis started recording the discrepancy in properties, and circulating copies of residencies, luxury cars, boats, etc. in contrast to the poor, crowded villages. The Bahraini government banned the use of Google Earth in Bahrain. You can guess what happened next – downloads shot through the roof. It’s just human nature.
The article in Financial Times gives more information.
When are governments going to figure out that when you ban a technology, you only make it more attractive? Google Earth downloads for free, it is available to everyone with a computer and adequate bandwidth. No matter what safeguards you put in, there are ways around it. That’s just the nature of technology.
Mahmoud’s Den sports a button that says “No Sunni, No Shiia, Just Bahraini”.
Christmas Cookies: Candy Cane Cookies
Red and white twisted together and formed into a cane – these are festive and tasty. Please, please, use real butter.
1 cup butter
1 cup powdered sugar
1 1/2 teaspoon vanilla
1 egg, beaten lightly
2 1/2 cups flour
1 teaspoon salt
Cream butter and sugar together, add vanilla and beaten egg. Sift flour and salt together, add to butter and sugar mixture.
Divide the dough in half.
Add red food coloring to one half – be generous, so it will be really red – several drops. Take walnut sized pieces of each color and roll between your hands until they are about 6″ long and about the same thickness from top to bottom. When all the white and all the red dough is rolled into 6″ lengths, take one of each color – red and white – and twist them around each other – you know, like a candy cane.
Place on ungreased cookie sheet and bend top over to form a hook. Bake at 375 F/190 C for about 8 – 10 minutes. Check at 8 minutes – you don’t want these ones to get brown, just thoroughly cooked!
Note – these are really really good for children to make. They love the rolling part, and just need a little help with the twisting together part.
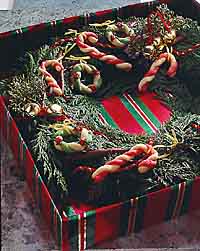
This is the only photo I could find, other than another with really awful candy canes made of red and green. I thought it was too awful. This one she is using the cookies on a wreath, but the cookies look pretty good.
Christmas Cookies: Sugar Roll Cookies
The trick I have found with these cookies is to glaze them with a sugar glaze. The cookies are cut, baked and then dipped on one side into a sugar glaze while still warm. This takes some preparation, but it’s worth it.
These cookies are a little fiddly, so you really need to do it on a more relaxed day. If you have a friend you can trust, it doesn’t hurt to have an extra pair of hands helping you. You will need a rolling pin, and some cookie cutters, powdered sugar and evaporated milk, and cookie decorations like silver balls, colored sugar sprinkles, cinnamon candies, etc.
Put down waxed paper under cookie racks to catch all the glaze that will drip off, it saves a big mess. Find three flat soup bowls, big enough to dip cookies in. Fill with powdered sugar. Put in drops of food color; be generous to get a good strong color.
Use evaporated milk, stirring in a drop at a time, until you have a glaze that is not too thick, but like cream. That way, when you dip the cookie in, and then turn it on it’s back to drain, the glaze will come down over the sides, but not too much will fall off. If it gets too thin, you need to add more sugar until it firms back up a little. Have plenty of powdered sugar on hand. It always takes a little experimenting, sometimes even just doing it on a humid day can make it trickier. But nothing you can’t handle.
Remember, this dough needs to be refrigerated, so you can make it ahead of time, and pull it out when you are ready to bake cookies.
Dough:
Cream together:
1 cup butter
1 cup fine sugar
Beat in one egg.
Sift and add to above:
2 1/2 cups flour
1 teaspoon salt
Add:
1 1/2 teaspoon vanilla
Mix all together well, and refrigerate several hours.
Roll out a little at a time, cut the cookies, put on cookie tray, bake at 350 F/180 C, 8 – 10 minutes or until slightly gold.
When they come out of the oven, cool two – three minutes, and quickly glaze while they are still warm but not hot.
Now those are the basics. Here are some hints:
When rolling out, rub flour into the rolling pin, and use as little as possible under the dough – the more flour, the tougher it gets. Try not to roll too much, and use a light touch.
If you are working with children, just relax and let whatever happens happen. If they eat the dough, oh well. They’re kids. If they want to decorate, let them decorate. Let these be the kids cookies.They won’t be beautiful, but the kids will think they are, and that is what matters. They’re kids!
If these are for your cookie-obligations, here are different hints.
Choose only three or four cookie cutters, and go for uniformity – it makes for a prettier plate. Like make a whole bunch of trees, glaze them all green, and put a silver ball on the end of each bough. It isn’t imaginative, but when the cookie trays go together, it just looks nicer. Make stars, one red cinnamon at each point. Or reverse, or whatever you think looks good, just make a whole bunch the same if you are giving these away.
Again, wait until the glaze and decorations are totally cool and dried before putting into containers to store. Store in a cool dry place, in an airtight container, and they will be good up to a month.
These cookies are from Baking 911 Ask Sarah where there is a lot more information about glazing, so if you are looking for a more advanced sugar cookie, go there!
Christmas Cookies: Spritz or Cookie Press
Not such a secret: when you buy your cookie press, there will be recipes inside.
Here is an old faithful recipe from The Joy of Cooking, a very dry cookbook with solid gold information when you are an inexperienced cook. The ingredients and instructions are from the book, but the explanations I am adding for clarity. Ask questions if it doesn’t make sense!
Although learning how to use a cookie press may seem hard, it’s about as hard as painting your toenails – you figure out the tricks as you go along. The cookies LOOK so fantastic, and you look so clever for making them . . . don’t tell how easy it is.
And remember, one reason we do these cookies is because we can make the dough a day or two ahead when we have a couple minutes, and stick it in the refrigerator in an air-tight container, and then just cook up a batch when we have the time.
I personally think they look better when you use strong food coloring, so don’t skrimp on the green or the red. It helps make your cookie platter look more festive.
Try one batch this year, just to get the hang of it. Double or triple next year, when you have more confidence in your cookie-press skills.
Heat oven to 350 F/180 C.
Sift together:
2 1/4 cups all-purpose flour (not self-rising, not whole wheat)
3/4 cups sugar (the finest sugar you can find, if it is too coarse, grind it finer if you can because big sugar will give you problems getting through the press)
1/4 teaspoon baking powder
1/2 teaspoon salt
Blend in, until mixture resembles coarse crumbs:
1 cup butter
(The best thing for “blending in” would be a food processor, or an pastry blender.)
Break one egg into a 1/4 cup measuring cup. If the egg does not fill the cup, add water until it equals 1/4 cup.
Stir egg into crumb mixture, and add 1 teaspoon vanilla. This is also where I add the food coloring.
Beat well, then chill. Put about a cup and a half dough into cookie press and press onto UNGREASED cookie sheet. The dough should be pliable, but if it becomes too soft, re-chill it slightly. Don’t get discouraged at first . . . it takes a little while to get it to come out right, and to stick to the pan . . . keep at it. You’ll get it, just keep trying. Once you know how, you never forget.
Bake at 10 – 15 minutes.

These beautiful cookies in the photo are courtesy of about Southern food.com.
Christmas Cookies: Russian Tea Cakes
Note: Americans call these cookies. My British friends call them biscuits. Either name, they taste wonderful.
Who knows where these cookies really came from? The first cookbook I used to make them called them Mexican Wedding Cakes, later I have heard them called Swedish Tea Cakes, Sugar Nut Balls, Pecan Sandies . . . I bet there are more. Russian Tea Cakes is just the name I like the best.
These cookies are the easiest. If you only do one cookie this year, this one is it. They store easily – you can even store them in layers, as long as you use a piece of waxed paper between the layers, otherwish the moisture in the cookie will soak into the powdered sugar. And they melt in your mouth.
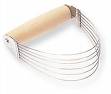
You will need at least two cookie baking sheets (flat or low lipped metal pans you find in the baking goods area) and two or more racks for cooling the cookies on. (A food processor helps this recipe go very fast. Chop the nuts first, empty into a bowl, then cream the butter and sugar.)
You will need powdered sugar, also called confectioners sugar – what a Godsend. I don’t even bother with a sifter, just use a good seive, put the powdered sugar in and tap the side of the seive with a spoon, and the sugar will sprinkle finely wherever you need it.
Heat the oven to 400 F/200 C. You don’t even grease the cookie sheets for these, because they have so much butter in them.
For these cookies, though, you have to cool them JUST ENOUGH, and then roll them in a small bowl of confectioner’s/powdered sugar. They have to be warm enough that the sugar wants to stick to them. Too cool and the sugar won’t stick so thickly. Too hot and you will burn your fingers!
1 cup butter, softened (a pint’s a pound the world round. That means that four sticks of butter make a pound, a pint is equal to 2 cups, so 2 sticks of butter equal one cup One stick of butter equals 1/2 cup.)
1 cup powdered sugar
When butter is softened, mix the butter and sugar together. You can do this with a fork, but it sure is easy in a food processor, or a mixer, especially if you are doubling or tripling this recipe. When butter and sugar are well mixed, add in the following:
1/4 teaspoon salt
1 teaspoon vanilla
2 cups white flour
1 cup finely chopped walnuts (pecans are wonderful if you can find them, and if they don’t cost an arm and a leg)
Now, take pinches about the size of a large date, or walnut, and roll them into a ball. When you put it on the cookie tray, flatten it slightly. I don’t know why. It’s just the way this cookie is made.
Pop the tray into the heated oven, set your timer for 8 – 10 minutes.
While the first batch is cooking, pour some powdered sugar in a small bowl.
Keep making balls, put them on the second pan while the first pan of cookies is baking. When the first batch is finished cooking, you can just pop the second batch in.
Check the cookies when the timer rings. They will be a light golden brown when they are ready. Take them out of the oven, and let them sit for about four minutes, so that they are warm, but not hot. Roll them in powdered sugar in a small bowl, and quickly put them on a rack until they are thoroughly cool. Do not pack them up until they are totally cool or they will absorb the powdered sugar when they are in the container.
This makes about 50 cookies. They are so easy . . . go ahead. Double the recipe.
You will see that I have given you a lot of extra instruction for your first time. Once you have done these and you know how easy they are, just use the bold, you won’t need all the blah-blah-blah!
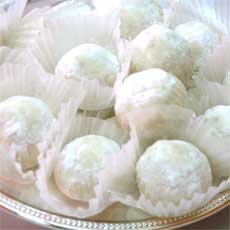
I borrowed this beautiful photo from a website where you can BUY these cookies, so if you would rather buy the cookies, you can do it here.
Recent Comments
intlxpatr on British Soldier Kidnapped, Esc… John on British Soldier Kidnapped, Esc… intlxpatr on British Soldier Kidnapped, Esc… John Smith on British Soldier Kidnapped, Esc… tigerbutterya0c5ff1d… on “Who Would Do Such a… Wikipedia Donate Button

Amazina

Early Voting in Florida


