Christmas Divinity Candy
Divinity can be tricky. You really really need a candy thermometer to get it right, and you need a dry day – a humid day will ruin your divinity.
You will need:
2 1/2 cups sugar
1/2 cup light Karo corn syrup (they have this at the Sultan Center, but it is EXPENSIVE!)
1/2 cup water
1/4 teaspoon salt
2 egg whites
1 teaspoon vanilla (or peppermint, if you can get it)
3/4 cup chopped walnuts
In a heavy pan, stir together sugar, corn syrup, water and salt. Using a candy thermometer, cook and stir over medium heat until sugar dissolves, carefully, so that you don’t splash this on the sides of the pan.
Once sugar has dissolved, don’t stir it any more, just keep cooking until the candy thermometer shows 260 F. Take off heat immediately.
In a large bowl, beat egg whites until they are stiff – you will need a mixer or hand mixer to do this right.
Pour the hot syrup in a thin stream over egg whites, using your mixer at a high speed. Adding the syrup slowly is the key to this recipe working.
Add vanilla, beat at high speed 4 or 5 minutes or until candy starts to hold it’s shape when you lift the beaters out. Mixture will be ribbony, and sort of hold it’s shape.
Drop by spoonfuls onto waxed paper. If it flattens out, beat the mixture another minute, then try again. Try not to overbeat; the mixture will get hard and stiff! If this happens, stir in a couple drops of hot water until it softens just enough. Yeh, it sounds tricky, but it’s just getting the right texture. You really can do this.
When the texture seems stiff enough but not too stiff, add the nuts in quickly, then drop by teaspoon on waxed paper, allow to cool and dry. (Some people add other inclusions – candied fruit pieces, chocolate chips, peppermint candies, crushed into small pieces, etc. I’m a purist – divinity is just white with nuts!) Store tightly covered – divinity absorbs humidity! Best if served the day it is made, or very soon. It is so good it doesn’t last very long, people just gobble it up.
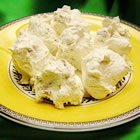
This photo is from AllRecipes.com.
Easy Kraft Christmas Fudge
This fudge is just so easy, it’s a sin. The only problem is finding Marshmallow Creme if you are living in a country where it is not readily available. We normally bring it with us when we come back from the US.
A plate of this fudge makes a great gift for a teacher or hostess.

3 cups sugar
3/4 cups butter
2/3 cups Carnation Evaporated milk, undiluted
1 12 ounce package semi-sweet chocolate chips
1 7 ounce jar Kraft Marshmallow Creme
1 cup chopped walnuts
1 teaspoon vanilla
Combine sugar, butter, and milk in heavy saucepan, bring to a full boil, stirring constantly. Continue boiling 5 minutes over medium heat, stirring constantly to prevent burning.
Take off heat, stir in chocolate chips and stir until melted.
Add Marshmallow creme, nuts and vanilla, and stir until well blended. Pour into a greased 9 x 13 inch pan. Cool at room temperature, then cut into squares. It’s a good idea to cut it sooner rather than later, as when it hardens, it is harder to cut into uniform squares.
This recipe doubles beautifully. If you are going to the trouble to make fudge, you might as well make a lot. 🙂
How easy is that??!!
Extra Credit Christmas Cookies: Rosettes
OK, good on ya, you’ve done your shopping and the cupboards are bulging. You’re already planning how to knock out those basic cookies, but now – now we get to think about trying something a little more challenging.
I will admit, this is not such a challenge to me. I grew up watching these made every year, it’s a Swedish thing. Now I make them every year, continuing the tradition. So I am going to share all the secrets with you, and you are going to do just fine.
First, a little theory. The rosettes I make every year use a sweet, lemon flavored mixture. Twice I have made savory timbales – you use a different batter. Those timbales are used to serve vegetables or something like lobster newburg when you have a lot of time and you want something to look very elegant, but the truth is, it’s a lot of work.
Meanwhile, rosette cookies for Christmas are also a lot of work, but you make a big batch at once, they last for up to six weeks in an airtight container, and they look very very cool and take up a lot of space on a cookie tray. And everyone thinks you are amazing, because they look so hard, but really, they’re not that hard.
Basic Rosette Lemon Batter
Beat 2 eggs
add 1 cup milk
Sift 1 cup flour
with a pinch of salt
1 Tablespoon sugar
Add to above and mix all together. It should look like thick cream. Add:
2 teaspoons of lemon extract, stir in.
Then you let the batter stand at least an hour. I often make it the night before and let it stand in the refrigerator overnight, then pull it out when I get up so that it warms up to room temperature. If you don’t let it stand, it doesn’t blend the right way.
You can do this in a pan on the stove . . .I did it that way for many years. But there is this wonderful machine called a deep fryer . . . if you have one, you are home free. I use something called a Fry Daddy, which is just the right size.
You will need a LOT of oil. I use a very mild vegetable oil like safflower oil or corn oil, something that doesn’t have a strong flavor on its own.
Warm the oil to 375 F/180 C.
Put out several sheets of paper towel. When the hot rosette comes out of the oil, you will pry it off the mold with the tines of a fork and let it rest upside down on the papertowel to absorb any of the excess oil.
Have a fork handy.
Choose the rosette wheel you want to use – most kits come with two or three. The most classic is a wheel shaped, but I also use a star and occasionally have used a butterfly. The timbale shape is also wheel shaped, but without all the divisions. Attach the form you choose firmly to the iron.
Get a comfortable chair, and sit by the hot oil. Have your bowl of batter right next to you, and paper towels nearby. Please, this isn’t something to do with children around, not when you are working with 3 – 4 cups of sizzling oil.
Dip the rosette iron in the hot oil, maybe five seconds, so it gets hot. (A hot iron is the secret to being able to get the rosette off easily when it is finished cooking.) Pull it out, tap it against the side of the pan to knock off excess oil.
Dip it quickly into the batter, it will hiss as the hot oil hits the cooler batter. Hissing is good, it means the iron is hot enough.
But dip into the batter only up to the top edge, not over the top edge! If the batter goes over the top edge, you will not be able to get the rosette off when it finished cooking.
So now you have a hot iron with batter on it, just right.
Plunge it into the hot oil. It will really hiss and bubble, that is what it is supposed to do, that means it is cooking. It will only hiss and bubble for maybe 30 seconds, then the hissing and bubbling will slacken. Somewhere between 45 seconds and 1 minute, pull the rosette out and see if it looks crisp and golden. Turn it upside down, tap excess oil back into the hot oil.
Over the paper toweling, use your fork to gently pry the rosette away from the mold in a couple places, and using gentle pressure, push the rosette off the mold. Place it upside down on the toweling so that it drains. One down!
At first, take it one at a time until you feel comfortable that you’ve got the hang of it. Then – you can actually do two irons at once. You let one iron heat while you are cooking the other rosette, then switch back and forth.
From time to time, maybe every ten rosettes, stir the batter again, because it can get oily and needs to be stirred.
If you do this with a pan on the stove, it is harder to maintain a steady temperature, and you will need a hot oil thermometer to keep track of it. When the oil gets too cool, the rosettes turn out too light and too floppy. If they get overcooked, they get too brown and they are hard to get off the iron. The deep fat fryer is your best bet for maintaining an even temperature.
This is also something more fun to do with a sister or a friend. My Mother and her best friend did it every year together; it was their special tradition.
OK, when you are finished with all your rosettes, and they have cooled, store them in a large tupperware container, WITHOUT CROWDING. These are so fragile, and they break easily.
Sift Powdered Sugar over Rosettes
When you want to take a tray of rosettes somewhere, you need to sift powdered sugar over the top, with the empty side up (the way they were when they were cooking) so that the powdered sugar goes down into the crevasses.
Some people use a sifter, but my preference is to use a small basket seive/strainer with a handle, put powdered sugar in it and tap it on the side with a fork. It controls where the sugar falls a little better, and gives more control over how much sugar you put on each rosette. Put them on the platter empty side up, so that they look all snowy and sugary and crisp.
WARNING! Do not attempt to eat one of these wearing a black dress! They are crisp, and they crumble, and sometimes powdered sugar goes everywhere, and it is a (mess) to get off.
As the cook, you get to eat the mistakes as you go along. At the end, you won’t want to eat any more. They aren’t so sweet, but they are mostly FAT! You will get other recipes for rosettes with your iron.
Have fun.
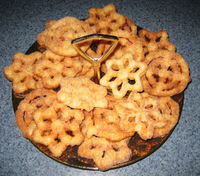
I found this photo at About housewares and it is a good photo, but to my way of thinking, the rosettes are upside down. I serve them the other way.
2011 Update: I used a Fry Daddy this year and every single rosette turned out perfectly. 🙂
Christmas Cookies: Candy Cane Cookies
Red and white twisted together and formed into a cane – these are festive and tasty. Please, please, use real butter.
1 cup butter
1 cup powdered sugar
1 1/2 teaspoon vanilla
1 egg, beaten lightly
2 1/2 cups flour
1 teaspoon salt
Cream butter and sugar together, add vanilla and beaten egg. Sift flour and salt together, add to butter and sugar mixture.
Divide the dough in half.
Add red food coloring to one half – be generous, so it will be really red – several drops. Take walnut sized pieces of each color and roll between your hands until they are about 6″ long and about the same thickness from top to bottom. When all the white and all the red dough is rolled into 6″ lengths, take one of each color – red and white – and twist them around each other – you know, like a candy cane.
Place on ungreased cookie sheet and bend top over to form a hook. Bake at 375 F/190 C for about 8 – 10 minutes. Check at 8 minutes – you don’t want these ones to get brown, just thoroughly cooked!
Note – these are really really good for children to make. They love the rolling part, and just need a little help with the twisting together part.
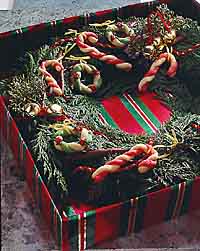
This is the only photo I could find, other than another with really awful candy canes made of red and green. I thought it was too awful. This one she is using the cookies on a wreath, but the cookies look pretty good.
Christmas Cookies: Sugar Roll Cookies
The trick I have found with these cookies is to glaze them with a sugar glaze. The cookies are cut, baked and then dipped on one side into a sugar glaze while still warm. This takes some preparation, but it’s worth it.
These cookies are a little fiddly, so you really need to do it on a more relaxed day. If you have a friend you can trust, it doesn’t hurt to have an extra pair of hands helping you. You will need a rolling pin, and some cookie cutters, powdered sugar and evaporated milk, and cookie decorations like silver balls, colored sugar sprinkles, cinnamon candies, etc.
Put down waxed paper under cookie racks to catch all the glaze that will drip off, it saves a big mess. Find three flat soup bowls, big enough to dip cookies in. Fill with powdered sugar. Put in drops of food color; be generous to get a good strong color.
Use evaporated milk, stirring in a drop at a time, until you have a glaze that is not too thick, but like cream. That way, when you dip the cookie in, and then turn it on it’s back to drain, the glaze will come down over the sides, but not too much will fall off. If it gets too thin, you need to add more sugar until it firms back up a little. Have plenty of powdered sugar on hand. It always takes a little experimenting, sometimes even just doing it on a humid day can make it trickier. But nothing you can’t handle.
Remember, this dough needs to be refrigerated, so you can make it ahead of time, and pull it out when you are ready to bake cookies.
Dough:
Cream together:
1 cup butter
1 cup fine sugar
Beat in one egg.
Sift and add to above:
2 1/2 cups flour
1 teaspoon salt
Add:
1 1/2 teaspoon vanilla
Mix all together well, and refrigerate several hours.
Roll out a little at a time, cut the cookies, put on cookie tray, bake at 350 F/180 C, 8 – 10 minutes or until slightly gold.
When they come out of the oven, cool two – three minutes, and quickly glaze while they are still warm but not hot.
Now those are the basics. Here are some hints:
When rolling out, rub flour into the rolling pin, and use as little as possible under the dough – the more flour, the tougher it gets. Try not to roll too much, and use a light touch.
If you are working with children, just relax and let whatever happens happen. If they eat the dough, oh well. They’re kids. If they want to decorate, let them decorate. Let these be the kids cookies.They won’t be beautiful, but the kids will think they are, and that is what matters. They’re kids!
If these are for your cookie-obligations, here are different hints.
Choose only three or four cookie cutters, and go for uniformity – it makes for a prettier plate. Like make a whole bunch of trees, glaze them all green, and put a silver ball on the end of each bough. It isn’t imaginative, but when the cookie trays go together, it just looks nicer. Make stars, one red cinnamon at each point. Or reverse, or whatever you think looks good, just make a whole bunch the same if you are giving these away.
Again, wait until the glaze and decorations are totally cool and dried before putting into containers to store. Store in a cool dry place, in an airtight container, and they will be good up to a month.
These cookies are from Baking 911 Ask Sarah where there is a lot more information about glazing, so if you are looking for a more advanced sugar cookie, go there!
Christmas Cookies: Spritz or Cookie Press
Not such a secret: when you buy your cookie press, there will be recipes inside.
Here is an old faithful recipe from The Joy of Cooking, a very dry cookbook with solid gold information when you are an inexperienced cook. The ingredients and instructions are from the book, but the explanations I am adding for clarity. Ask questions if it doesn’t make sense!
Although learning how to use a cookie press may seem hard, it’s about as hard as painting your toenails – you figure out the tricks as you go along. The cookies LOOK so fantastic, and you look so clever for making them . . . don’t tell how easy it is.
And remember, one reason we do these cookies is because we can make the dough a day or two ahead when we have a couple minutes, and stick it in the refrigerator in an air-tight container, and then just cook up a batch when we have the time.
I personally think they look better when you use strong food coloring, so don’t skrimp on the green or the red. It helps make your cookie platter look more festive.
Try one batch this year, just to get the hang of it. Double or triple next year, when you have more confidence in your cookie-press skills.
Heat oven to 350 F/180 C.
Sift together:
2 1/4 cups all-purpose flour (not self-rising, not whole wheat)
3/4 cups sugar (the finest sugar you can find, if it is too coarse, grind it finer if you can because big sugar will give you problems getting through the press)
1/4 teaspoon baking powder
1/2 teaspoon salt
Blend in, until mixture resembles coarse crumbs:
1 cup butter
(The best thing for “blending in” would be a food processor, or an pastry blender.)
Break one egg into a 1/4 cup measuring cup. If the egg does not fill the cup, add water until it equals 1/4 cup.
Stir egg into crumb mixture, and add 1 teaspoon vanilla. This is also where I add the food coloring.
Beat well, then chill. Put about a cup and a half dough into cookie press and press onto UNGREASED cookie sheet. The dough should be pliable, but if it becomes too soft, re-chill it slightly. Don’t get discouraged at first . . . it takes a little while to get it to come out right, and to stick to the pan . . . keep at it. You’ll get it, just keep trying. Once you know how, you never forget.
Bake at 10 – 15 minutes.

These beautiful cookies in the photo are courtesy of about Southern food.com.
Early Christmas Preparations
Did you know that Thanksgiving used to be earlier in November, and when it was moved to the 4th Thursday in November, the merchants objected because it shortened the Christmas shopping season? It seems to me that the season gets started earlier and earlier every year, in spite of the Thanksgiving change.
In Germany, many people used to put up the tree on Christmas Eve day. We usually put ours up around December 15th – we wanted to have the beauty in the house, but also wanted to be sure it would last without drying out and becoming a fire hazard. It was cold enough that we could buy the tree and keep it outside, and then put it up when we had the time and energy.
And our tradition was that the tree had to be down by the Feast of Epiphany, on January 6th, the day the church celebrates the Wise Men (probably Persians) who came seeking the small baby born in Bethlehem.
We are having a smaller Christmas this year. With my Dad so ill, I don’t have the psychic energy to go all out as usual. Last year, we were all together; Dad and Mom bought tickets for Christmas Eve Day for all of us, the huge entire family, to go see the Nutcracker Ballet together. It was hugely fun. The production was lively and beautiful and delightful, all our plans went smoothly, and then we gathered back at Mom and Dad’s for finger-food dinner and a cut-throat game of Hearts. So much laughter, so much fun.
So I have the packages wrapped and my husband, God bless him, will get them in the mail today to insure they will arrive in time for Christmas. Although we are not going back, our son and his bride will be with us for Christmas here in Kuwait – alhamdullah! In my heart, I think of her as “the Seaside bride” – they were married on a gorgeous late afternoon in April on a snowy white sand beach in Florida. She was glowing and beautiful. He was beside himself with happiness. It was one of the happiest days in my life.
It was a bright, sunny afternoon. The minister, in his black suit, had sunglasses on. When we posted the photos, all our friends asked if he was FBI. He looked like a “man in black”.
On our way to church last night, I saw people who already have Christmas trees up and ready, all lit up in their windows. I remember last year in Qatar, where the word “Christmas” is never mentioned in the ads; stores advertise “seasonal decorations”. We celebrated 50 years of the church in Kuwait last night, and I thank God to live in a sophisticated country, where we are free to worship the same God, but in our own way.

(Qatteri Cat thinking about getting ready for Christmas)
But for me, it’s still too early to put up a tree. It is too bright, too sunny, the Christmas tree looks diminished in the bright light. I have my boxes labled so I can pull out the early decorations first, without having to go through everything. Just a few baubles, a few little lights, and a little more next week.

(Thought I would go silver this year, courtesy of some cool stuff from IKEA, but it was too cold and hard, softened up by adding just a little additional color)
Mom’s Fruit Cake Recipe
Wooo Hooooooo! The fruitcakes are in the oven, and already the house smells wonderful. I’ve been making these cakes since I got married. I don’t think I have missed a year, but I may have. I grew up smelling these delicious cakes every winter. I don’t think my Mom makes them every year any more. I wish I were close enough to pop one into her refrigerator for their holidays.
Mom’s Fruit Cake
Even people who think they HATE fruit cake like this fruit cake. It has a secret ingredient – chocolate!
This is the original recipe. I remember cutting the dates and prunes with scissors when I was little; now you can buy dates and prunes without pits and chop them in the food processor – a piece of cake!
1 cup boiling water
1 cup sugar
1/2 cup lard or butter
1 T. cinnamon
1 t. cloves
3 Tablespoons chocolate powder
1/4 cup jelly
1 cup seeded raisins
1 cup chopped walnuts
1/2 cup candied citron
1/2 cup cut prunes
1/2 cup cut dates
Put all in a pan on stove and bring to a boil. Boil for three minutes. Let cool. Add:
2 cups flour
1 teaspoon baking soda
Flavor with lemon
Bake at 350° in loaf pans for one hour. Makes 2 normal bread loaf sized cakes.
My variations: I put in about three times the fruit, the difference primarily in the candied citron – I prefer using whole candied cherries, because they are so pretty when the loafs are cut. This recipe doubles, or quadruples with no problems.
Pans: Mom used to line all the pans with brown paper and grease the paper. I grease the pans, then dust with more of the chocolate powder. Use a good quality chocolate, not cocoa. When the cakes come out of the oven, let them cool for ten minutes, loosen them with a knife, then they will shake out easily. Let continue to cool until they are totally cool, then wrap in plastic wrap, with several layers, then foil, then seal in a sealable plastic bag. Let them age a couple months in a corner of your refrigerator. I make mine around Halloween, and serve the first one at Thanksgiving.
I never make these the same any two years in a row. This is the first year, ever, that I won’t be using any brandy – alcohol in Kuwait being against the law. Yeh, I have some friends who laugh and say “you can get it anywhere!” but we made a decision to obey the law. Only rarely do I regret it . . . sigh . . .fruitcakes really need brandy.
Update: If you are in a country where brandy is available, and if you want to use brandy, here is how to use it in this recipe. You know how raisins get all dried out and taste yucky in fruitcakes? The night before you intend to make the fruitcakes, take all the raisins you intend to use (depending on how many fruitcakes you intend to make) and put them in a glass container. Pour brandy over them, to cover. Microwave just to the boiling point. Let stand in the microwave overnight.
The next day, you can drain that brandy and use it in a stew or something, and in the meanwhile, you now have plump, juicy raisins to use in your fruitcake, and just a hint of brandy flavor. Yummmm!
Recent Comments
ExpatAlien on What Country am I Living … intlxpatr on Yellowstone: Old Faithful to C… Michelle on Yellowstone: Old Faithful to C… Cathy on No Grown-Ups in Charge intlxpatr on Waiting for Snow Wikipedia Donate Button

Amazina

Early Voting in Florida


